Blog

Creating HDR Textured Area Lights in Blender

We've learned a lot about area lights in Blender during the development of the HDR Light Studio add-on. Lexie, our Blender plug-in developer, is sharing what we found out here, showing how to set up HDR textured area lights and mesh emitters. We hope you find this useful whether you end up using our HDR Light Studio add-on or not.

Area lights produce realistic lighting when mapped with high dynamic range images on their light properties. The light intensity comes from the HDR textures mapped onto the area lights, and this produces high-quality reflections of the light source. The Blender scene needs to mimic real world lighting and HDR images on your area lights are the secret ingredient. Bright areas of the HDR texture will produce realistic lighting reflections - making your final rendering realistic. Using HDR textures on area lights is another type of image based lighting, but using the HDR image on each 3D area light. HDR reflections will bring your materials alive - so now it's time to shine and learn how to make area lights in your Blender scene.

There are two ways to create Area type lights in Blender: 

  • Blender Area Light objects with a HDR texture applied to them. These are perfect for cases where you want the light itself to be hidden from the camera’s view.
  • Mesh Emitters made from a mesh plane with an emissive material applied to one side. These lights are useful when you want to be able to see the geometry of the light in your scene. Plus mesh emitters allow the light to be solid with a correctly applied alpha, producing a more physically correct result.

OK, so let's look at how to make some of these now...


Creating Transparent Blender 'Area Lights'

Mapped with an RGB HDR image

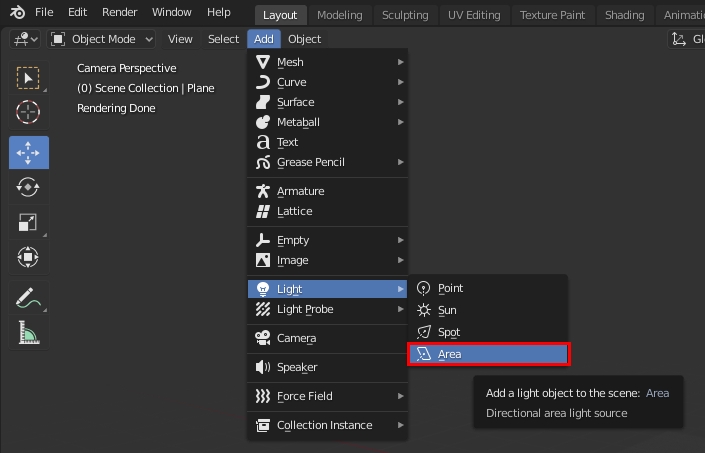
Add an area light to your scene using the Add menu, and position it how you want.

Add > Light > Area
Add > Light > Area
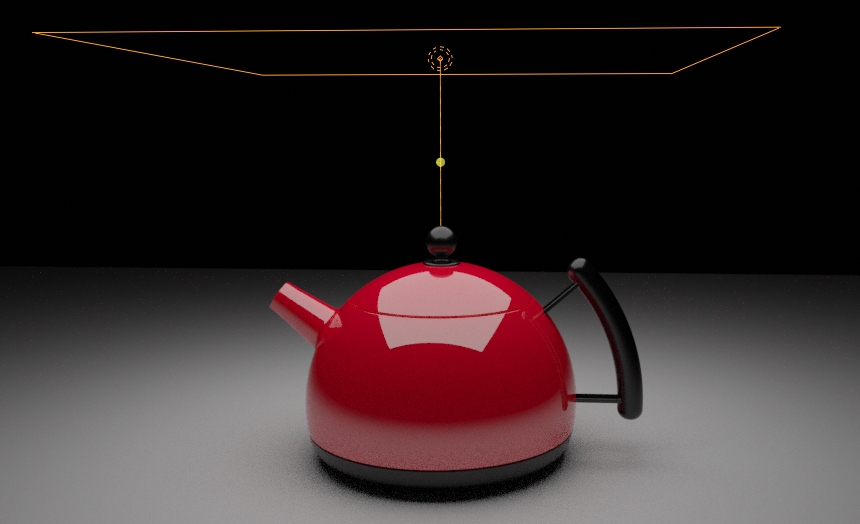
See how the light is invisible to the camera but seen in reflections

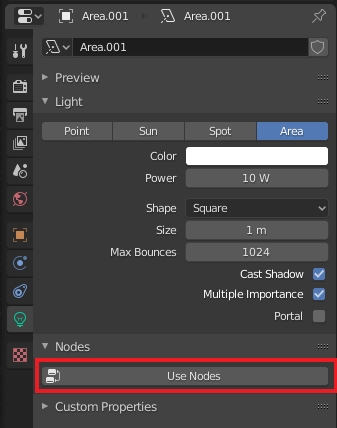
Next, in the ‘Properties’ editor, under the light tab, click ‘Use Nodes’ and then switch to viewing the ‘Shader Editor’ to view the node network. By default it will have an Emission node connected to a Light Output node.

Setting up Blender area light to use a node network
Setting up area light to use a node network
Switch to the Blender Shader editor tab
Switch to the Shader editor tab
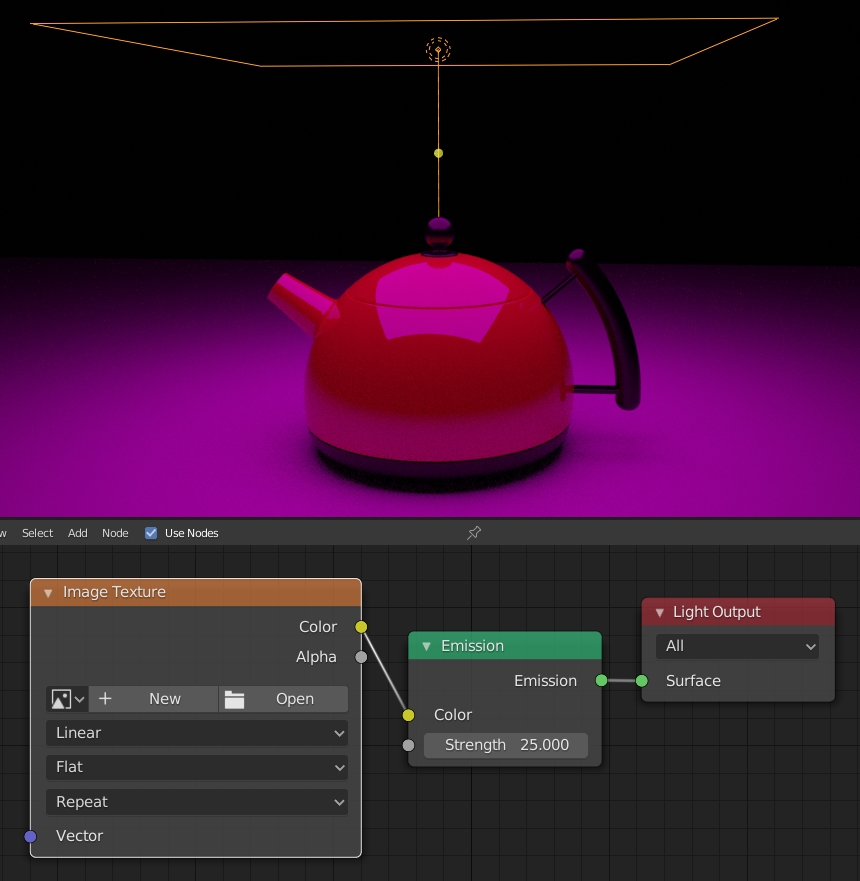
Emission node into Light Output

If you just want a light with a plain colour, then this is all you need. You adjust the brightness of the light using the Strength value on the Emission, which was changed to 25 in the example above.

But we want to create a textured light, so we’ll need to add in some more nodes. First we’ll add in an Image Texture node and connect its colour output to the colour input of the Emission node.

Blender Area light with missing texture

Your light will now be bright pink. This is because Blender doesn’t have an image file to use so it uses its default missing texture file, which is pink.

To add your texture click Open on the Image Texture node, this will open up the file explorer allowing you to select your chosen texture file. We’re using a 3 channel RGB EXR of a light source.

RGB HDR image texture file used shown at different exposures

We need to change the ‘Extension’ of the image, which is set in the third menu down. Set this to Clip.

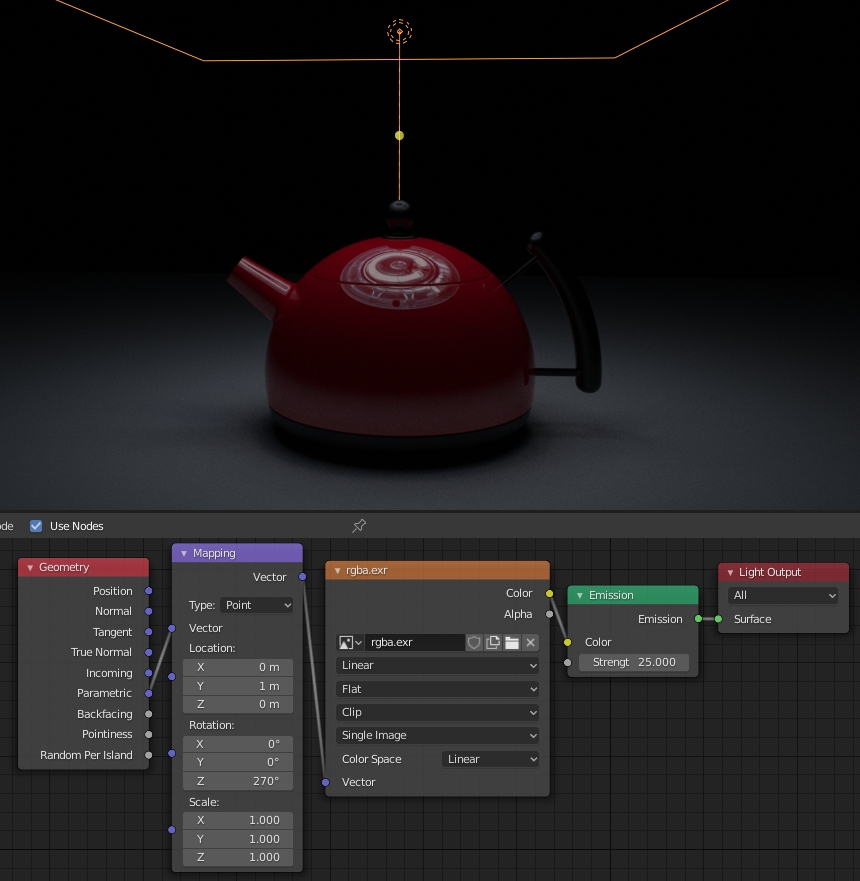
So far we can’t actually see our lights output. To remedy this we’re going to need to do some texture mapping. Add in a Mapping node and a Geometry node.

Connect the Parametric output of the Geometry node into the Vector input of the Mapping node.

Then connect the Vector output of the Mapping node to the Vector input of the Image Texture node.

The final touch is to orient your image texture correctly. To do this, on the Mapping node, set Location to (0, 1, 0)m. and the Rotation to (0, 0, 270)°.

Node network for creating an area light with a 3 channel input image

So that’s how to create a textured Blender area light using a three channel input image, nice and simple!

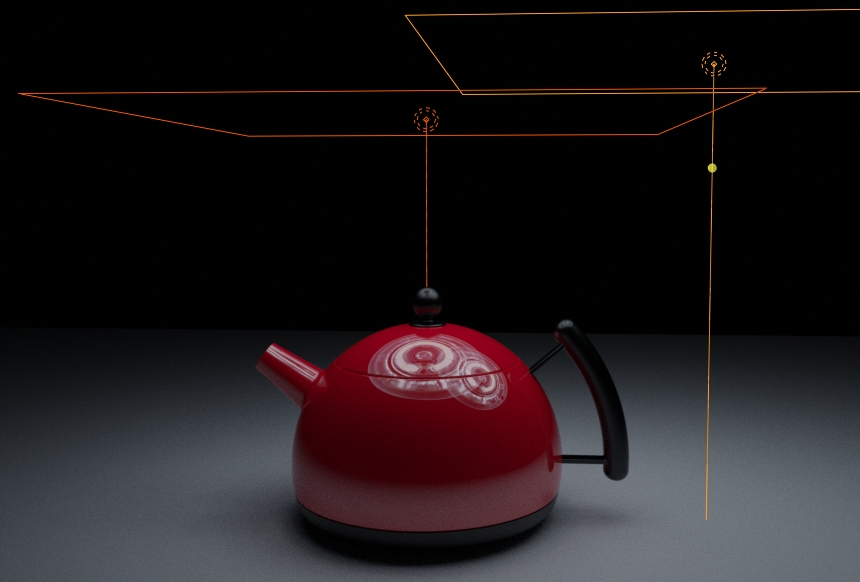
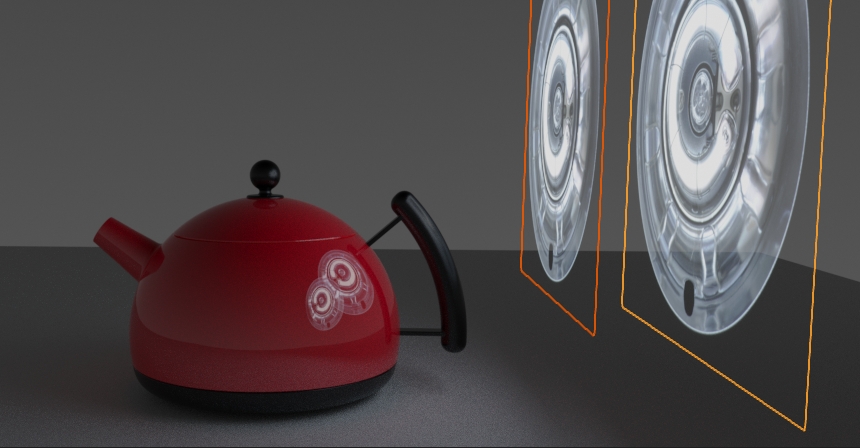
In the image below we have duplicated the area light and moved it. You can see how these area lights are actually adding their brightness when seen in reflections, they appear translucent. So you would be able to see through them to the environment for example, or in this case, through to another area light. This isn't a problem as such, for many situations this is fine. However to be more correct a light should be solid, and use an alpha for the transparent areas. This way, the closest light would obscure the other. We show a method to do this later.

See how both lights are actually translucent


Creating Transparent Mesh Emitter Area Lights
Mapped with an RGB HDR image

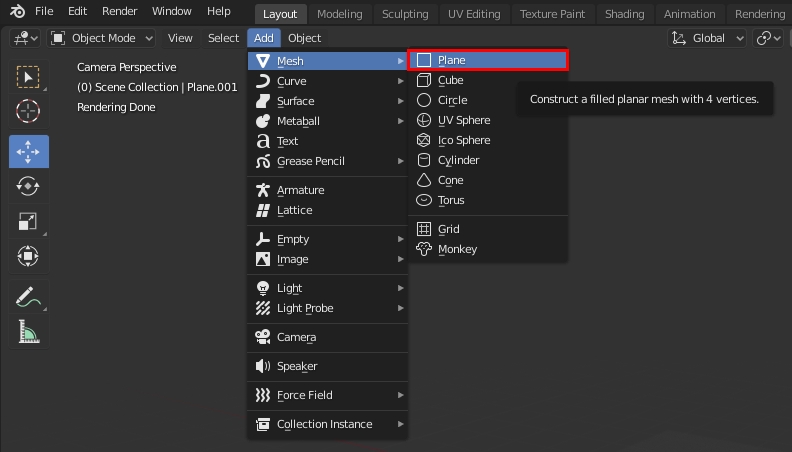
This time our starting point is a mesh plane, so add one to your scene and position it where you want.

Add > Mesh > Plane
Add > Mesh > Plane

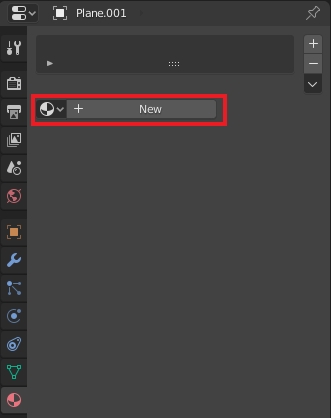
Now go to the materials tab on the ‘Properties’ editor for the Plane and click ‘+ New’.

Add new material to apply to your mesh plane

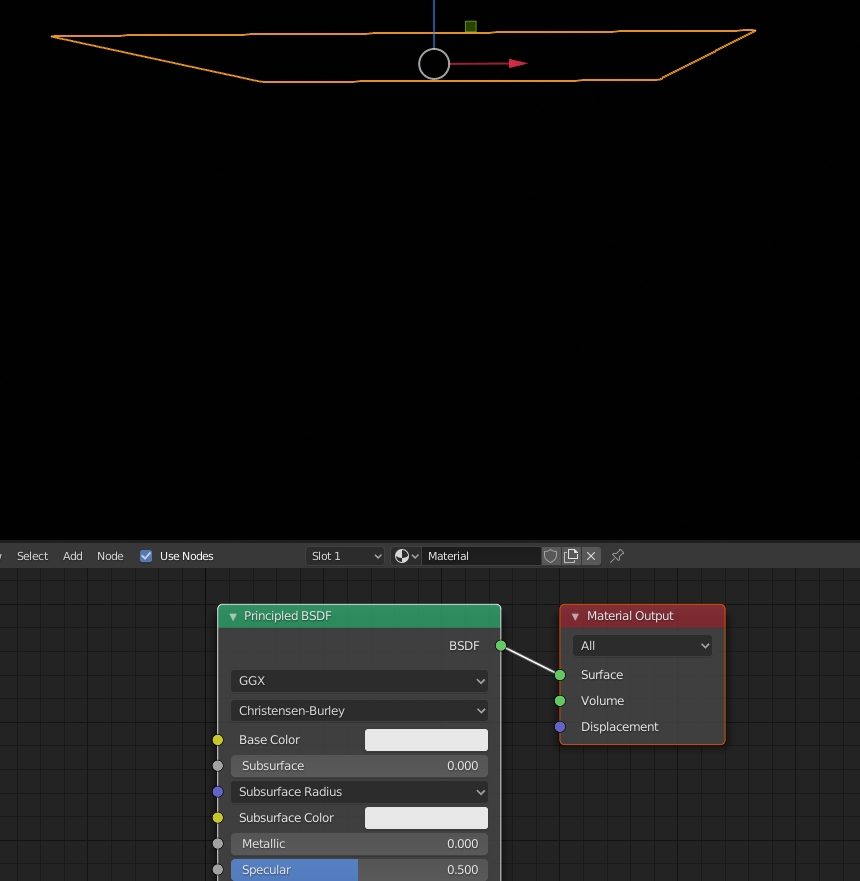
If you toggle to the ‘Shader Editor’ you will see a Principled BSDF node connected to a material output node.

Default node network for a material, it is not emitting light

We are going to get rid of the Principled BSDF node, leaving just our material output node. Your mesh will now be completely black.

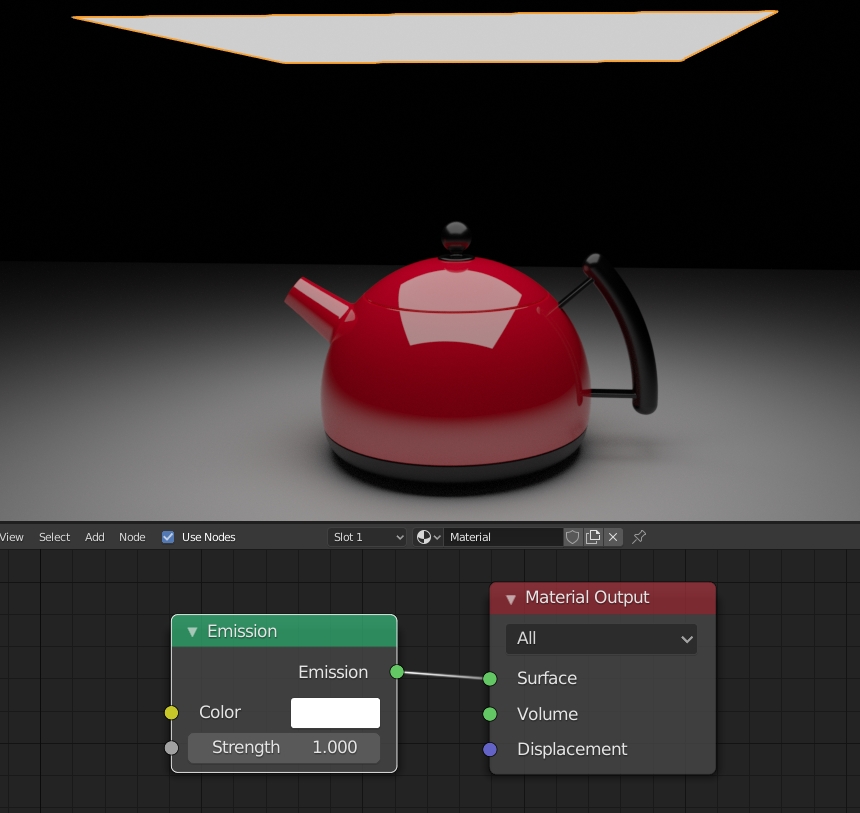
The Blender area light we made previously had an Emission node by default, for the mesh we’ll need to add one and connect it up to the ‘Surface’ input of our Material Output node.

Emission node connected to material output

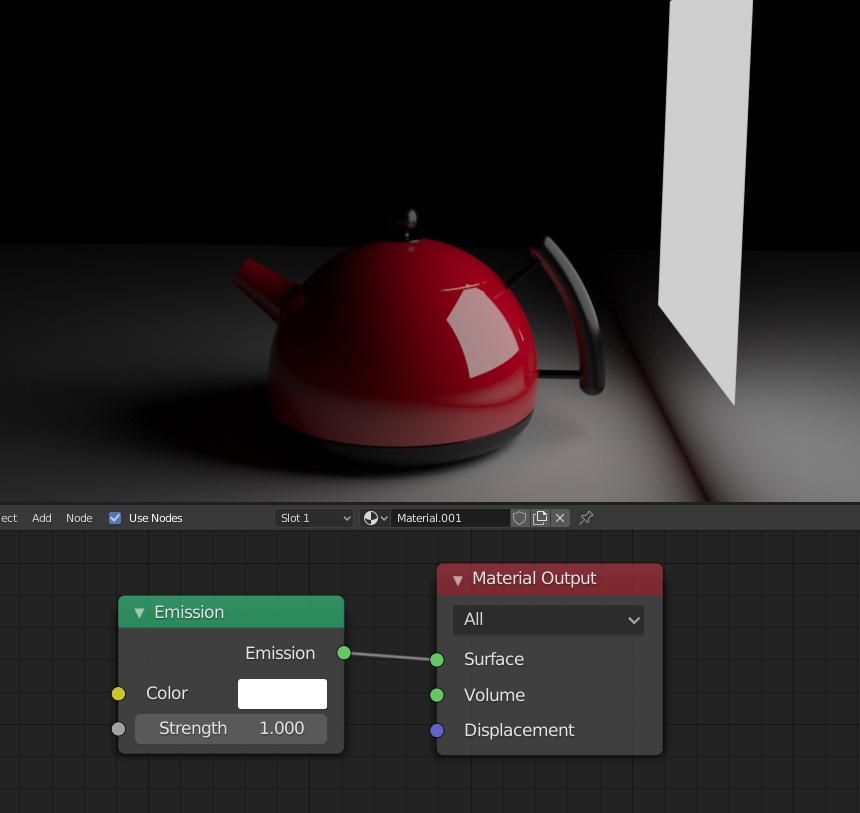
But if we move the light, we can see the plane is actually emitting white light on both sides.

Double sided emitting plane

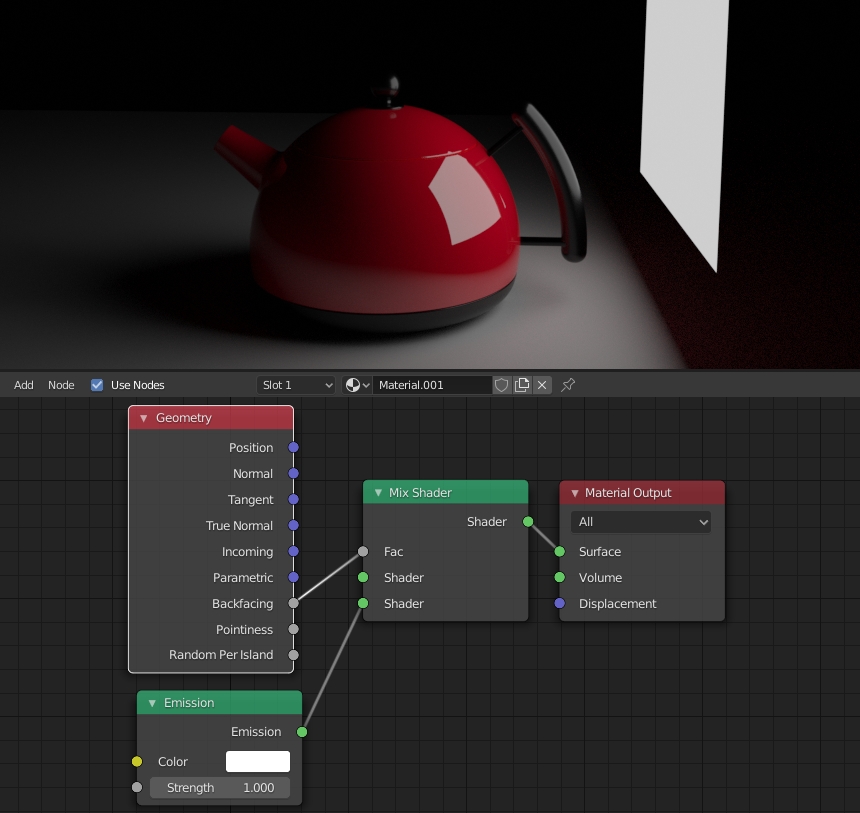
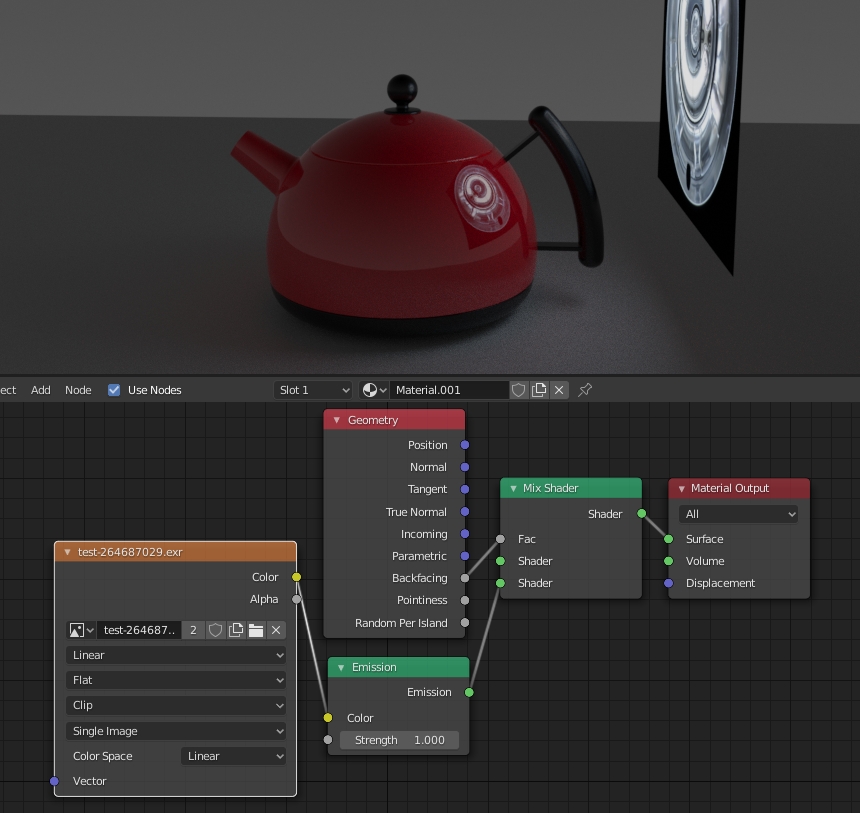
We want a single sided light, so we’re going to add in a Geometry node and a Mix Shader node.

Disconnect the Emission node from the Material Output node.

Connect the Emission the bottom ‘Shader’ input on the Mix Shader node.

Connect the ‘Backfacing’ output of the Geometry node to the ‘Fac’ input of the Mix Shader.

Link the Mix Shader’s output to the ‘Surface’ input of the Material Output.

Node network for single-sided emitter, no texture

We now have a single sided emitter. Now it’s time to add the texture.

Add an Image Texture node, set extension to Clip and use the file selector to choose an image file.

If we connect the Color output of the Image Texture node straight into the Emission node, then our light will look like this. (Note: We added a grey environment so we can see that the light is not actually transparent)

Node network for single-sided emitter, with texture, but is solid with black edges

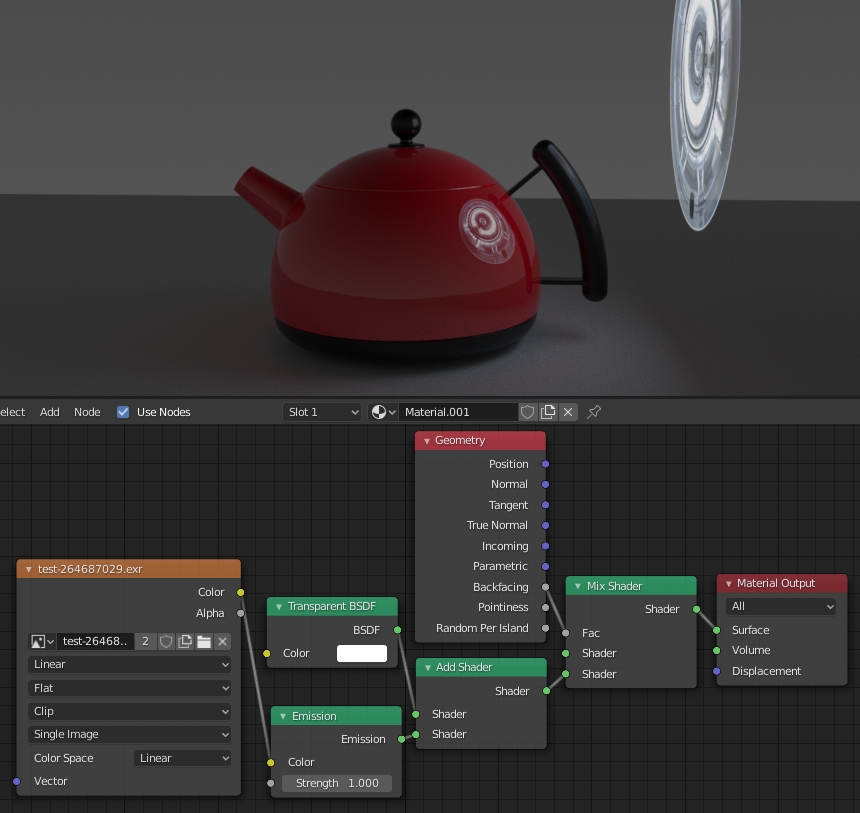
We want the light to appear transparent so we dont see the black parts of the light texture in the reflections.

Add a Transparent BSDF node and an Add Shader node.

Connect the output of the Transparent BSDF node into one of the Add Shader 'Shader' inputs.

Connect the output of the Emission node into the other Add Shader 'Shader' input.

Connect the Shader output from the Add Shader, into the Mix shader.

The light in your scene will look something like this. You can adjust the brightness of the lights by altering the strength of the Emission node. It looks the same as the previous Area Light with an RGB texture, but you can see the light in the camera view.

Network for transparent Blender mesh light with RGB texture
We can see the lights are transparent when seen overlapping in the reflections


Creating Solid Mesh Emitter Area Lights
Mapped with an RGBA HDR image using Alpha for Opacity

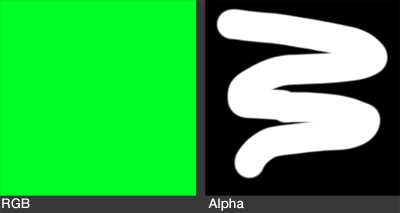
We show here the seperated RGB and Alpha, but it is a single image with 4 channels that we are going to use for this example. This is not a HDR image actually, but we will treat it as such and swap it for an actual HDR light source image later. This image makes it easy to see what is happening with the 4 channels on our light.

RGBA Texture for Blender Mesh Emitter

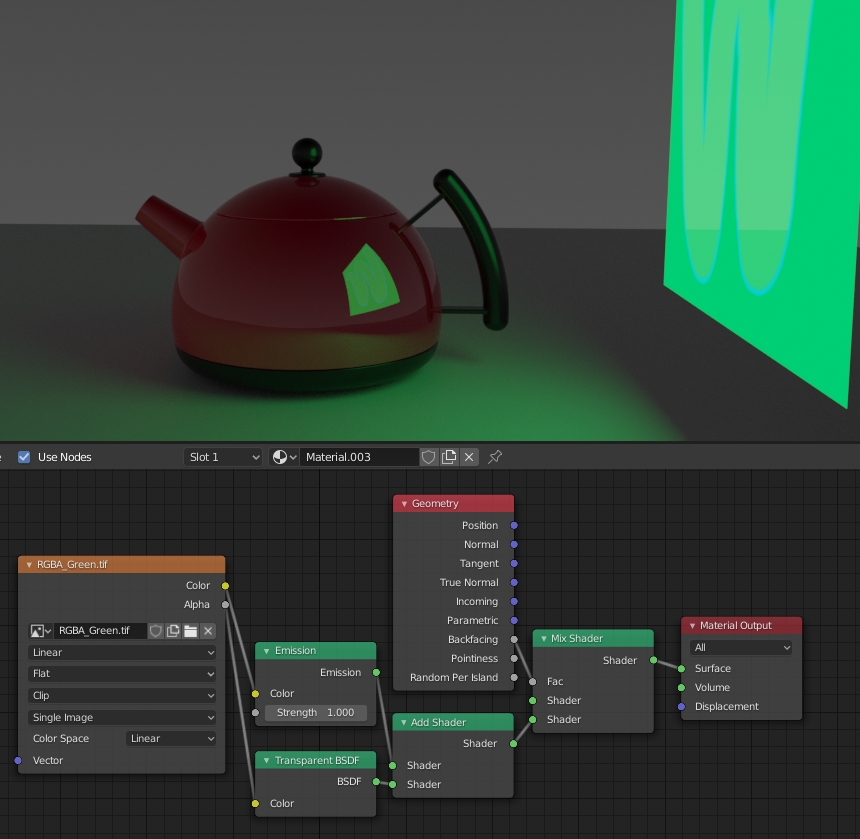
We have set up the network very similar to before when we created a mesh emitter using an RGB image. But we have piped the alpha from the RGBA image into a Transparent BSDF. However you can see most of the light is solid, with the squiggle in the middel actually translucent showing through to the floor.

Starting network for RGBA mesh emitter

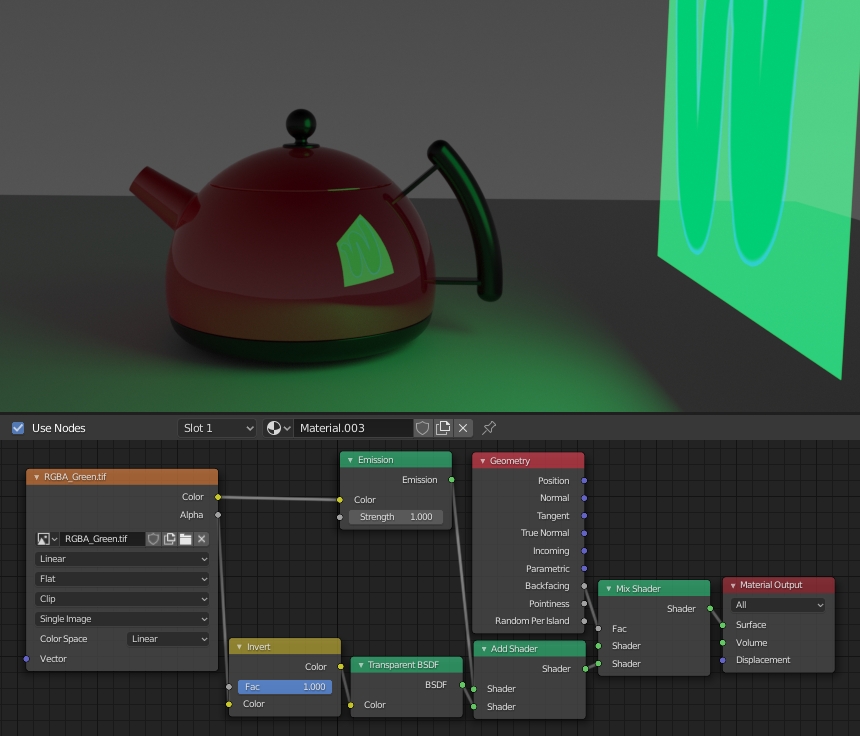
We are going to fix this by adding an Invert node between the Alpha from the texture, and the Transparent BSDF. Now you can see through the outside area and the squiggle is not transparent.

Added Invert node
Added Invert node

But we still have a problem. The outside of the light should be totally invisible using the alpha, but it is still emitting light. We need to mutliply the RGB values in the image by the alpha channel. So that we have a solid squiggle emitting light and the rest of the light is totally invisible because it''s black, and not emitting.

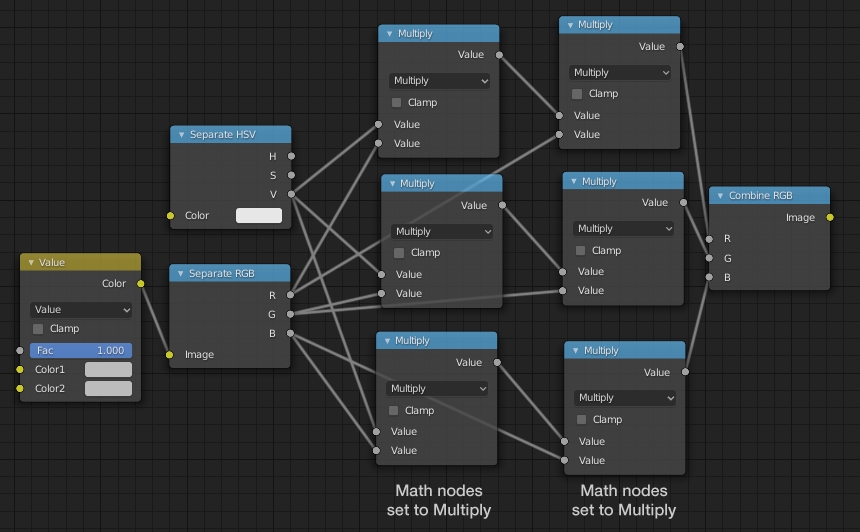
To do this we need to make a somewhat complex addition to the network. Pan away from your existing network and create the network below using the nodes shown.

This network will take the Color and Alpha output from the texture, and will multiply the alpha values into the RGB values and combine this back into image data to use for the emission.

Note, the nodes called Multiply are actually Math nodes, when you change their setting to Mulitply, their top bar is then named Multiply. Don't go searching for Multiply nodes.

Nodes to multiply the Alpha into the RGB

In the image below we have moved the new network near to the original network, preparing to plumb it in.

Getting ready to plumb in the extra nodes

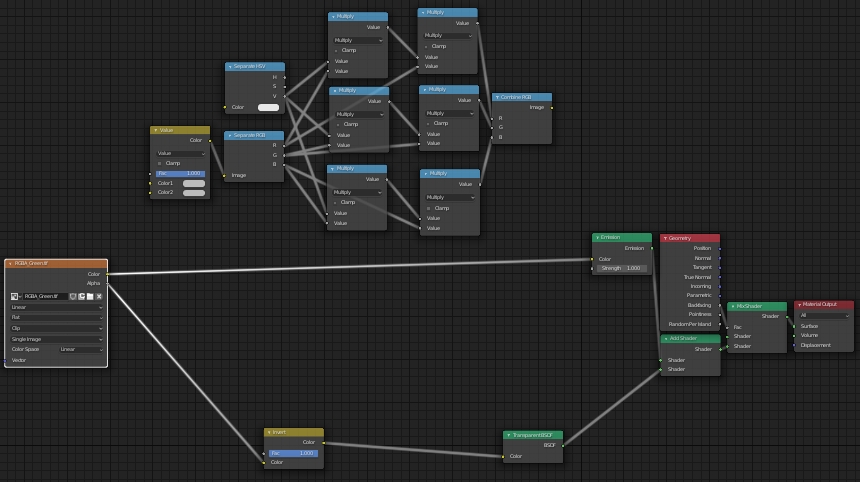
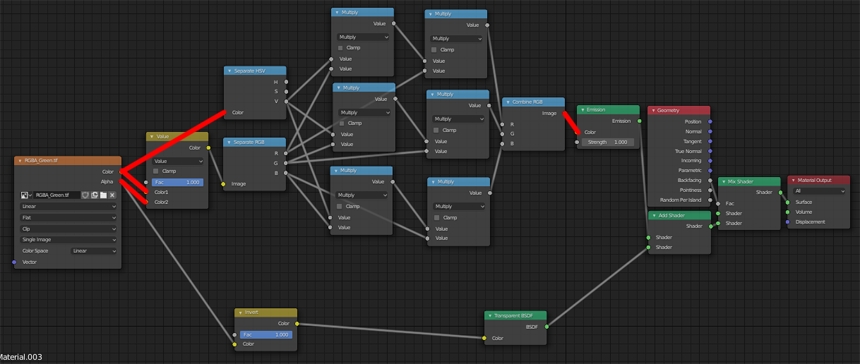
The image below highlights in red the connections we made to add these networks together.

Red lines show how we added the 2 networks together

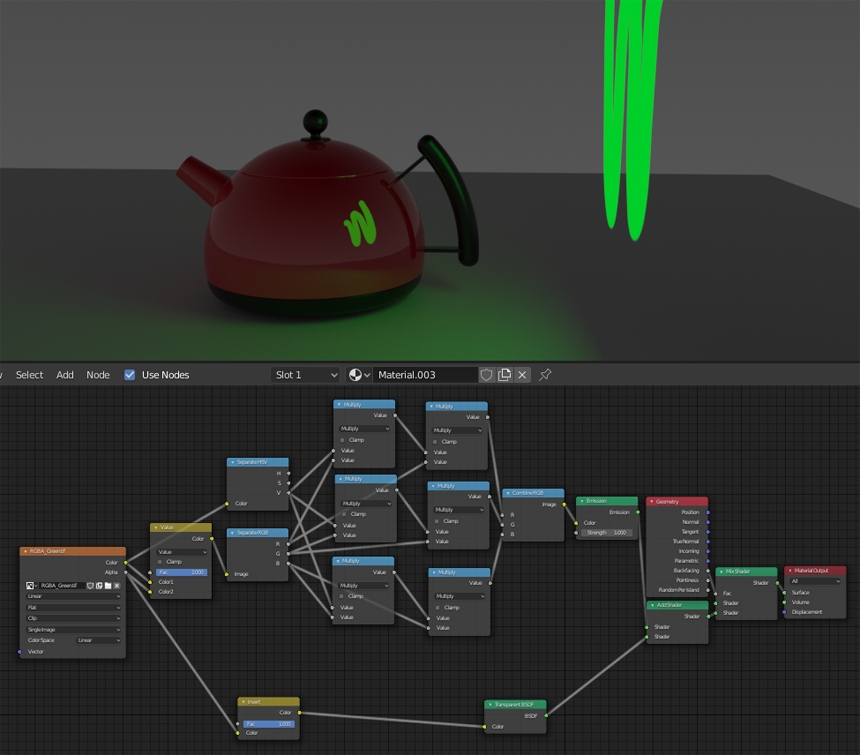
Below we can see the result. A bright green squiggle emitting light from the mesh. With the alpha part of the image making the rest of the surface totaly invisible.

The final network producing the result we wanted

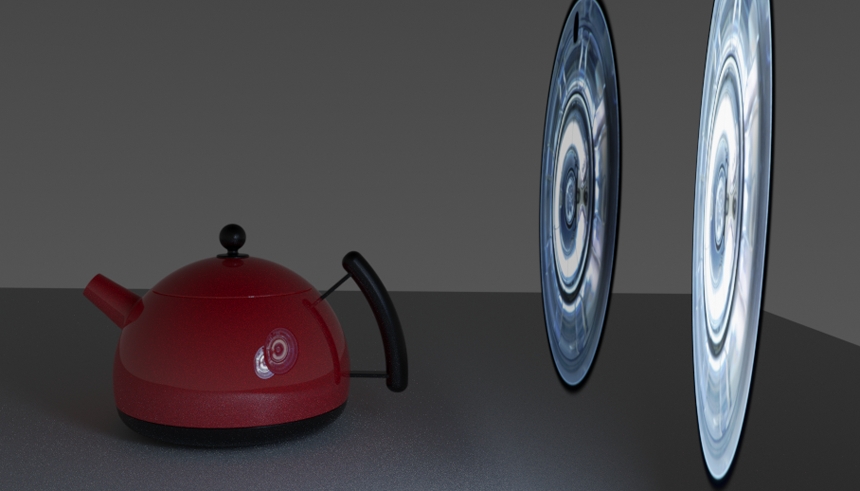
Now let's swap the texture for the final RGBA EXR file of a light source. Plus let's duplicate the mesh light and move it to see if the lights are solid and obscuring each other correctly.

Render result with the nearest Blender mesh light solid and obscuring the other in the reflection

So that's the end of the tutorial showing different ways to set up area style lights in Blender using HDR textures.


HDR Light Studio for Blender
A faster way to work with Area Lights

The HDR Light Studio add-on for Blender builds area lights and a shader network for your chosen renderer (Cycles, Eevee, Octane and Renderman) in an instant - saving lots of time and clicks. HDR Light Studio also allows you to create and edit HDRI maps live with Blender too. Using a combination of HDRI map for the environment lighting and HDR textured area lights in 3D - you can perfectly make Blender HDRI lighting with realistic reflections coming from high-quality HDR images.

Watch the HDR Light Studio for Blender promo video

Click on the button to find out more about HDR Light Studio for Blender

HDR LIGHT STUDIO FOR BLENDER