The Power of HDR Light Studio - Basic

Yes, Basic is the baby of the family… but it is still a very useful part of the toolkit, especially with HyperShot.
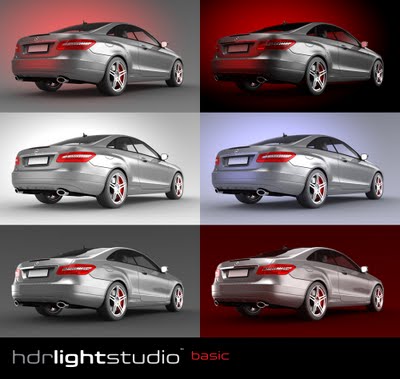
For example, take the 6 renders above. It’s the same data, materials and camera angle for all 6 shots. All that’s in the scene is the car. Everything else comes from HDRI maps made with HDR Light Studio Basic Edition. There isn’t even a floor, just a ground shadow turned on in HyperShot.
No Photoshop was needed at all, just HyperShot and HDR Light Studio Basic.
TIP1: To get the glows behind the car, simply place a weak soft light in to the HDRI design in this visible part of the HDRI. It makes it more dynamic.
TIP2: The advantages of having no floor geometry are: 1) It renders faster not having to think about it and 2) You can place lights in the HDRI that are below floor level so you can then add light anywhere to make the car look good. So you can get a nice reflection in the side of the car with a light placed below the horizon, even if this were impossible in reality. The HyperShot ground shadow beds the car down, so it still looks real.
TIP3: Colour your lights whilst setting up your lighting so you know what light is coming from where. These can be quickly changed back to the colour you wanted once you are happy with light and reflection positions.

